Enfim...
Enfim a tão esperada notícia finalmente está pronto meu projeto o:


Acesse o link:

 Temos muitas opções de contadores na web então temos que decidir qual usaremos:
 Quer receber contatos de pessoas atráves do seu blog!
 Esse Widget serve para que você possa mostrar as atualizações do twitter na coluna lateral.
Para você exibir a contagem dos seus seguidores no Twitter use o:
Que disponibiliza diversos botões estatísticos no estilo FeedBurner, e também códigos prontos para serem usados nas suas próprias personalizações.

 O que é Favicon
link href='URL_DA_IMAGEM_FORMATO_ICO.ico' rel='shortcut icon'/
link href='URL_DA_IMAGEM_FORMATO_PNG.png' rel='shortcut icon'/


 Vamos falar um pouco sobre Search Engine Optimization (SEO), e aprender o que é sitemap e a criar um sitemap para o seu blogger.
<b:includable id='comments' var='post'>Destacando os comentários do autor
<div class='comments' id='comments'>
<a name='comments'/>
<b:if cond='data:post.allowComments'>
<h4>
<imgsrc='http://IMAGEM.png'/>
<b:if cond='data:post.numComments == 1'> 1Comentário: <b:else/>
<data:post.numComments/><data:commentLabelPlural/>:
</b:if>
</h4>
<dl id='comments-block'>Inclua as partes que está em negrito
<b:loop values='data:post.comments' var='comment'>
<dt class='comment-author' expr:id='"comment-" +data:comment.id'>
<a expr:name='"comment-" + data:comment.id'/>
<b:if cond='data:comment.authorUrl'>
<a expr:href='data:comment.authorUrl'rel='nofollow'><data:comment.author/></a>
<b:else/>
<data:comment.author/>
</b:if>
<data:commentPostedByMsg/>
</dt>
<b:ifcond='data:comment.author == data:post.author'>
<dd class='blog-author-comment'>
<p><data:comment.body/></p>
</dd>
<b:else/>
<dd class='comment-body'>
<b:if cond='data:comment.isDeleted'>
<spanclass='deleted-comment'><data:comment.body/></span>
<b:else/>
<p><data:comment.body/></p>
</b:if>
</dd>
</b:if>
<dd class='comment-footer'>
<span class='comment-timestamp'>
<a expr:href='"#comment-" + data:comment.id' title='commentpermalink'>
<data:comment.timestamp/>
</a>
<b:include data='comment' name='commentDeleteIcon'/>
</span>
</dd>
</b:loop>
</dl>
. blog-author-comment {Mude a cor e o plano de fundo como quiser.
margin:.25em 0 0;
}
.blog-author-comment p {
margin:0 0 .75em;
padding:5px 10px;
border:1px dotted #c0c0c0;
background:#f5f5f5;
}
<dt class='comment-author'expr:id='"comment-" +data:comment.id'>Inserindo icones dos comentários do autor
<a expr:name='data:comment.anchorName'/>
<b:if cond='data:comment.author == data:post.author'>
<aexpr:href='data:blog.homepageUrl'>
<data:comment.author/></a><b:else/>
<b:if cond='data:comment.authorUrl'>
<aexpr:href='data:comment.authorUrl'><data:comment.author/></a>
<b:else/>
<data:comment.author/>
</b:if></b:if>
<data:commentPostedByMsg/>
</dt>
<dt class='comment-author'expr:id='"comment-" +data:comment.id'>Para aprender a habilitar a caixa de comentários no blogger, leia: Formulário de comentários no blogger
<a expr:name='data:comment.anchorName'/>
<b:if cond='data:comment.author == data:post.author'>
<aexpr:href='data:blog.homepageUrl'>
<imgsrc='http://URL_DA_IMAGEM/Imagem.png'/>
<data:comment.author/></a><b:else/>
<b:if cond='data:comment.authorUrl'>
<aexpr:href='data:comment.authorUrl'><data:comment.author/></a>
<b:else/>
<data:comment.author/>
</b:if></b:if>
<data:commentPostedByMsg/>
</dt>


Quer me perguntar, então acesse: http://www.formspring.me/RamonPE
 Clique na imagem para ampliar

 Clique na imagem para ampliar
 Clique na imagem para ampliar
  Clique na imagem para ampliar
 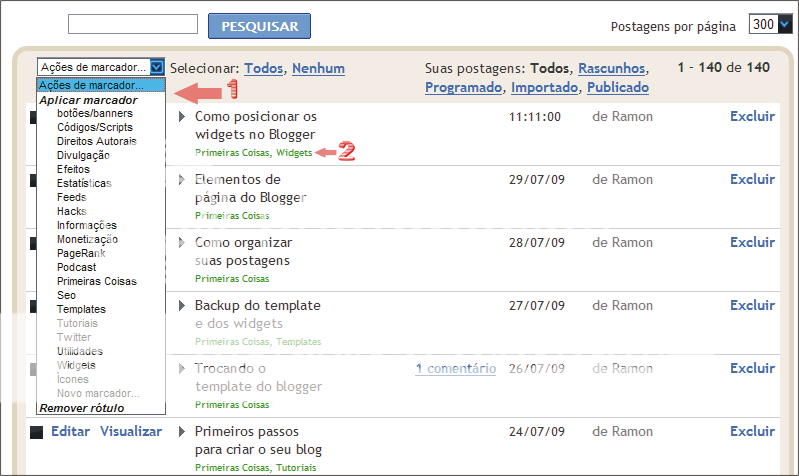 Clique na imagem para ampliar
©Template by Pelo Estilo and Dicas Blogger - Contato - Termos de Uso
 Leia mais...


